Showing posts with label Tips. Show all posts

Tuesday, January 13, 2015

Prevent K2 SmartForms from automatic sign-in

If you build an application using K2 SmartForms and using its runtime URL to browse the application, by default K2 SmartForms will automatically log in using current Windows user credential.

Sometimes we want to prevent this default behavior occurs and users must enter their credential manually to log in to K2 SmartForms application. To do this, we have to alter K2 SmartForms configuration in IIS.

Open IIS in K2 SmartForms server, choose Runtime website, then select Authentication.

image

Click Forms Authenticaiton and click Edit.

image

a dialog window will be opened. Observe the Login URL field, change its content to ~/Login.aspx. By default the login URL field content is _trust/Login.aspx

Click OK to save configuration. Recycle the application pool that K2 SmartForms is using, then try to browse the runtime URL, a login page will be appeared.

image

You can log in using domain credential to log in to K2 SmartForms Runtime environment.

Tuesday, June 24, 2014

Menggunakan ADO.NET Parameter

Seringkali saya menjumpai developer menggunakan string concatenation seperti ini untuk melakukan query ke database.

conn.Open();
using(var cmd = conn.CreateCommand())
{
  cmd.CommandText = "select * from employee where kode='" + txtUserName.Text + "'";
  var reader = cmd.ExecuteReader();
  if(reader.Read()) 
  {
     //bla bla bla
  }
}
Code di atas (untuk kondisi tertentu) memang dapat dijalankan dengan baik, dan saya akui kadang sayapun melakukan hal tersebut (karena kepepet deadline).

Sebenarnya code di atas punya celah keamanan yang kurang baik, yaitu sangat rentan dengan serangan SQL Injection.  Selain itu code di atas tidak dapat menerima input pada txtUserName.Text yang mengandung single quote.

Saya tidak akan membahas lebih detail tentang SQL Injection di sini, melainkan saya mengajukan solusi untuk menghindari penggunaan string concatenation seperti contoh di atas, yaitu dengan menggunakan ADO.NET Parameter.


Keuntungan penggunaan ADO.NET Parameter ini adalah:

1. Code yang kita tulis terbebas dari celah keamanan SQL Injection

2. Input parameter dapat berupa teks yang mengandung single quote (‘) maupun double quote(“).


Cara penggunaan ADO.NET Parameter, adalah dengan menggunakan collection property Parameters dari object Command.

Berikut contoh di atas yang ditulis ulang dengan menggunakan ADO.NET Parameter:


conn.Open();
using(var cmd = conn.CreateCommand())
{
  cmd.CommandText = "select * from employee where kode=@kodeuser";
  cmd.Parameters.AddWithValue("@kodeuser", txtUserName.Text);
  var reader = cmd.ExecuteReader();
  if(reader.Read())
  {
    // bla bla bla
  }
}

Perhatikan penggunaan method AddWithValue pada contoh di atas:


  1. Parameter pertama dari method tersebut adalah nama parameter yang digunakan di dalam query SQL, dan parameter kedua adalah value yang ingin diberikan ke dalam query.

  2. Setiap parameter di dalam query menggunakan prefix @

Kita dapat memberikan lebih dari 1 parameter dalam sebuah query, asalkan semua nama parameter diawali dengan simbol @.

Thursday, January 23, 2014

Conditional Validation in K2 SmartForm

I have to admit that currently K2 SmartForm is lack of built-in validation functionality, you can only specify which fields are required to be specified before the form is submitted.

In this post, I will show you a trick how to create a custom validation based on a condition.

Our form (or view) is very simple:

image

It contains:

  • 2 Text boxes which have names: Amount Text Box and Comment Text Area
  • 2 Labels for field header (I ignore the control’s names).

It is a petty cash request form. User can request for specified amount of money and specify notes if needed. Here is the condition:

  • If Request amount >= 1000000 (above or equal to 1 million), user must specify notes.
  • If Request amount < 1000000 (below 1 million), the notes field is optional to be specified.

If we use common validation condition in SmartForm, we can only specify whether field Notes is required or not, we cannot validate Notes based on certain condition.

Here is my trick;

1. Add a text box to Form or View, give it name: Notes. Clear Visible check box in its property. This new text box will act as fake “Notes” text box:

image


2. Create some expressions, click the Notes text box (the invisible textbox), select Expressions in property window, click Add to add new expression, give it name Comment is Blank:

image

Create a new expression again and give it name Request Above 1M:

image

Create again a new expression and give it name Notes Validation:

image

Value 9 is random value, you can use any value other than 9.

Make sure the last expression is selected before closing Expression window:

image


3. Create rule for click event of Submit button, add validation to the rule:

image


4. Specify validation configuration:

image

See validation configuration window above: mark Amount Text Box and Notes (text box) as required. Note that Comment Text Area does not need to be required and do not activate “Do not validate hidden…” option, and activate “Show validation message…”.

Then add Show a Message action if validation passes:

image

Click OK and then click Finish to close message configuration window and Rules Wizard Configuration window.

Click Finish to save the Form / View.

Let’s try to run the Form / View:

If I specify 500000 in Request Amount text box and I do not specify any comments, my request can be submitted:

image

However, if I specify 5000000 in Request Amount text box, the validation will occur:

image

I have to specify something in Notes field (it is Comment Text Area) :

image

You can make the Notes text box becomes visible to see how this trick happens and yes, building forms using K2 SmartForm is very tricky Smile with tongue out

Wednesday, January 8, 2014

Creating Running Number in K2 SmartForm

This post will show you how to generate running number using K2 SmartForm. Running Number is a common feature in transaction forms, such as Invoice Number, Purchase Order Number, Quotation Number, etc. It is always incremented by 1 for each saved entry.

In this post, I will show you an example how to generate request number for Room Booking Request. Room Booking Request can be used for requesting a room for a purpose such as meeting, interviewing, and so on.

Let’s create our Room Booking Request SmartObject, give it name as Booking:

image

Request Number will contain running number which we’ll develop later in this post.

Let’s create Auto Number SmartObject:

image

Current Number will contain a number which is always increment by 1 for each new booking request.

Then, using SmartObject tester, insert a default row to Auto Number SmartObject:
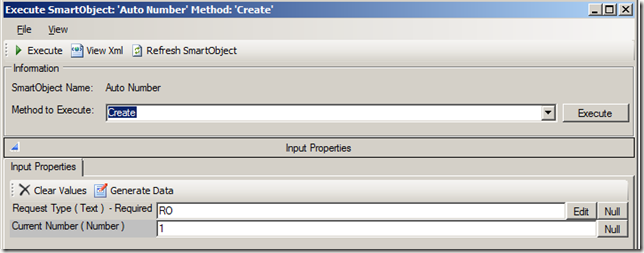
image

Give the value 1 to Current Number and RO for Request Type, then click Execute to create a new row.

Now, we will generate a view for booking request data entry, right click on Booking SmartObject, then click Generate Views, click Item and give it name as Booking Item:

image

Click OK to generate the view.

Make a view layout to be neat looking as follow:

image

Delete Create, Delete, Load buttons as we don’t need them, change Save button text to Save as Draft. Then add two text boxes to the view, give them name Current Number Text Box and Increment Number Text Box, we can place them anywhere since we will make them as invisible to users. In my example below, the two new text boxes is placed next to Save as Draft button.

image

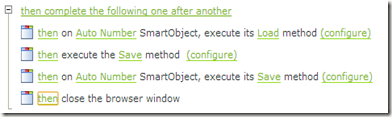
Switch to Rules tab and inspect when Save Button is clicked rule, K2 Designer has created a default behavior for Save:
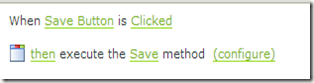
image

Add a new action Execute SmartObject method before Execute the Save method.

In the newly added action: select Auto Number SmartObject, and select Load method.

image

Click configure option of the newly added action:

In Request Type input mapping type RO:
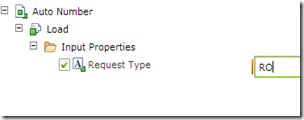
image

Click Next, then map Current Number property to Current Number Text Box:

image

Add a new action again of Execute SmartObject method after Execute the Save method, select Auto Number Smart Object and Save method:
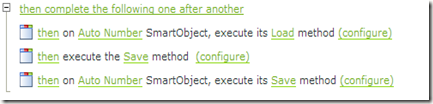
image

Click configure option:

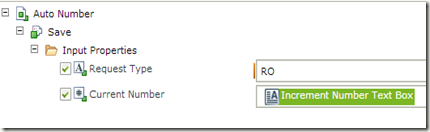
Map Increment Text Box to Current Number and type RO in Request Type:
image

Click Finish to close configuration window.

Add a new action again of Close browser window:
image

Click Finish to close Rules Wizard Configuration window.

Switch back to Layout tab, then select Increment Text Box, select Expression property, click Add to create a new expression. Drag Current Number Text Box to expression details area , drag Plus operator from Operators tab – Operators node, and type 1 after Plus operator. Click Validate to verify the expression.

image

If the expression validation passes, click Finish twice to return to view layout.

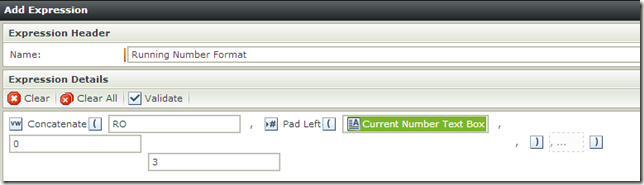
Select Request Number Text Box, then select Expression property, click Add to create a new expression. Give it name Running Number Format as expression name. Drag Concatenate function from Operators tab – Text node, and drag Pad Left function as follow:
image

Click Finish twice to return to view layout. Make the Current Number Text Box and Increment Number Text Box invisible by unchecking Visible check box property.

Click Finish again to save the view.

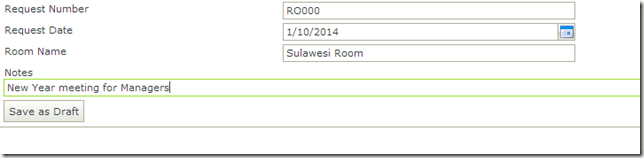
Now we can try to run the view. Click on Booking Item view at the tree node, you will see Runtime URL at right panel, click the Runtime URL, the browser will create a new window/tab:
image

Click Save as Draft to save entry and the view will be closed after saving.

To view the request data, switch to SmartObject Tester, select Booking SmartObject, right click and select Execute SmartObject, change Method to Execute to GetList and click Execute button:

image

Why my request number starts from 7 ? Because I had tried to create data before I wrote this blog post  and I deleted them all. But if you follow steps in this article, your request number must be started from 1 (RO001).

Tuesday, November 26, 2013

Zooming

If you have been doing public presentation using projector and laptop, you may want to zoom an area or region to make the audience pay attention for some details in your screen. Usually, the presenter will change zoom level of projector, or the presenter will change the font size of the presentation document.

Actually, Windows has a built-in zoom feature that you can activate it easily with single keystroke. The built-in zoom tool is Magnifier and you can activate it by pressing Windows and Plus key. The plus key usually placed beside backspace button.

image

If you press Windows-Plus once, you will activate Magnifier and your screen has not zoomed yet. Press it for the second time will zoom your screen.

You can bring your screen to normal size (zoom out), either by pressing Windows – Minus or close the Magnifier window.

The other tool to zoom your screen is ZoomIt from SysInternals tool, and you can download and using it freely. With ZoomIt, you can define your own keystroke for zooming-in and zooming-out.

image

The Ctrl-1 is the default keystroke for toggle zooming.

Friday, November 22, 2013

Removing USB Drive

Sometimes I’m too lazy to remove USB drive using taskbar. We can remove USB drive from taskbar by clicking Safely Remove Hardware and Eject Media.

image                image

but as I said, sometimes I’m too lazy to do it and I prefer remove it by using command line since I can do it immediately rather than moving my pointing device.

The command line tool can be downloaded from here.

Using this tool, I can remove my USB drive or other removable drive from command prompt:

image

we can also invoke it using PowerShell:

image